blog
Spring OAuth例子
之前写了一篇关于Spring OAuth的文章Spring OAuth,其实是大致翻译了一下Spring OAuth官网的开发手册。这两天回头再看,发现一点印象都没有了,这几天根据官网的例子又熟悉了一下。
补充一下,本来是网上查一下,然后自己根据网上的例子写一个类似的来熟悉,结果一直报错,后来发现自己使用的SpringBoot版本和网上例子的SpringBoot版本不一样,导致自己套用网上的例子报错。最后没办法,直接使用SpringBoot官网的例子来学习OAuth了。
sso代码地址:https://github.com/spring-cloud-samples/sso
authserver代码地址:https://github.com/spring-cloud-samples/authserver
关于Spring OAuth的通俗介绍,可参考[OAuth2.0的一个简单解释](http://www.ruanyifeng.com/blog/2019/04/oauth_design.html
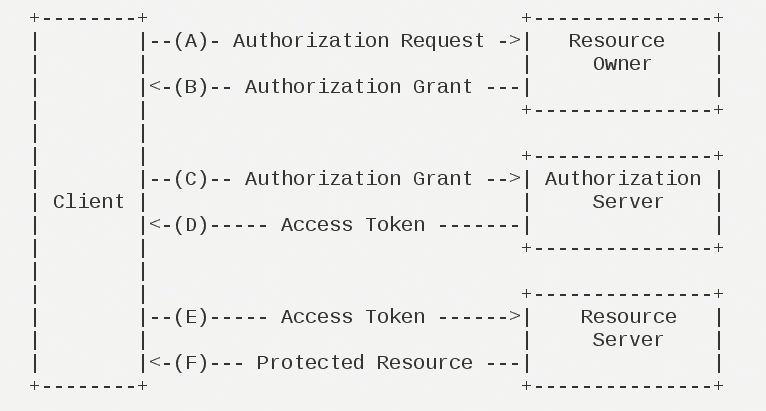
OAuth2.0运行流程图如下:

(A)用户打开客户端以后,客户端要求用户给予授权。

(B)用户同意给予客户端授权。

(C)客户端使用上一步获得的授权,向认证服务器申请令牌。

(D)认证服务器对客户端进行认证以后,确认无误,同意发放令牌。

(E)客户端使用令牌,向资源服务器申请获取资源。

(F)资源服务器确认令牌无误,同意向客户端开放资源。
OAuth2.0的四种授权模式
- 授权码模式(authorization code)
- 简化模式(implicit)
- 密码模式(resource owner password credentials)
- 客户端模式(client credentials)
根据上面提到的例子,画了一下授权码模式的序列图
Title: Authorization code sequence chart
Client->Authorization Server: 1、GET:/oauth/authorize
Note left of Authorization Server: response_type:code\nclient_id:\nredirect_uri:\nscope:\nstate:
Authorization Server->Client: 2、login
Client->Authorization Server: 3、GET:/oauth/authorize
Client->Authorization Server: 4、POST:/oauth/authorize
Client->Client: 5、redirect to location
Client->Authorization Server: 6、/oauth/token
其中:
-
客户端申请认证,固定路径(/oauth/authorize),包含如下参数
-
response_type:授权类型,必选项,此处的值固定为”code”
-
client_id:客户端id
-
redirect_uri:重定向uri
-
scope:申请范围
-
state:客户端的当前状态
-
-
由于没有登录,所以认证服务器显示登录页面,用户输入账号密码登录。服务器在response header中返回Location
HTTP/1.1 302 Found Location: http://localhost:8080/uaa/oauth/authorize?client_id=acme&redirect_uri=http://localhost:9999/dashboard/login&response_type=code&state=F2LuyQ -
客户端再次调用第一步的申请认证接口,请求路径固定为
/oauth/authorize,界面会提示是否需要授权给XXX用于访问XXX。 -
用户点击同意授权后,客户端使用POST方式向服务器获取授权码,请求路径固定为
/oauth/authorize,服务器在response header中返回Location,此时包含认证码(code)HTTP/1.1 302 Found Location: http://localhost:9999/dashboard/login?code=bPz4vs&state=ary0m1 -
客户端自动重定向到上一步的Location
-
客户端使用POST方式,使用上一步获取到的认证码code向认证服务器申请令牌,请求路径固定为
/oauth/token
上述步骤完成后,客户端就可以使用如下代码获取到令牌类型以及令牌值
public Principal user(Principal user) {
        OAuth2Authentication oAuth2Authentication = (OAuth2Authentication) user;
        OAuth2AuthenticationDetails details = (OAuth2AuthenticationDetails) oAuth2Authentication.getDetails();
        System.out.println(details.getTokenType());
        System.out.println(details.getTokenValue());
        return user;
    }
需要注意两点:
上述步骤只需要配置即可,其它的工作SpringBoot已经完成
SpringBoot版本不同,配置也不同,需要根据对应的版本查询官方文档如何配置
对于其它几个授权模式,没有再去深入研究了。
其实主要还是要对OAuth2.0的几个授权流程要非常了解,这样在使用SpringBoot的OAuth时上手就会很快。
2020-3-25补充
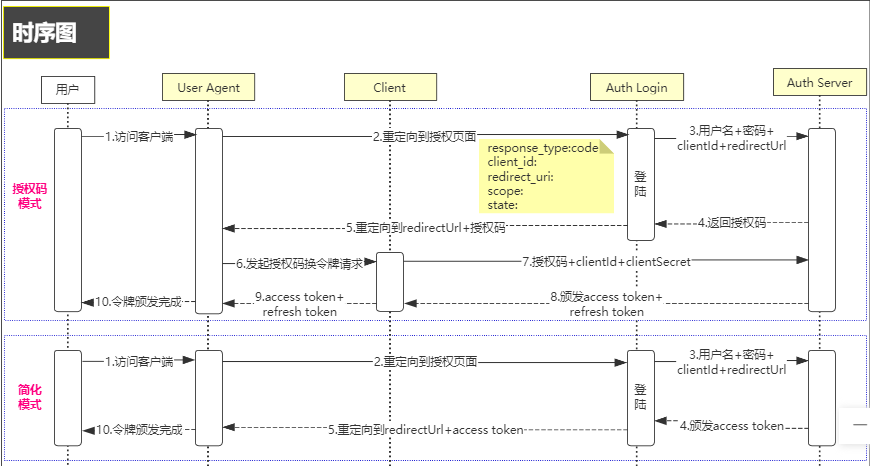
今天看到一个讲四种授权类型的时序图,摘抄下来学习


参考文档:
https://processon.com/view/5cf07c85e4b0bc8329e21ab8?fromnew=1